7.0 KiB
Compiling on Windows using MSVC
If you're just creating mods or games with Luanti, you do not need to compile Luanti. Instead, follow Ruben Wardy's Luanti Modding Book to get started modding. Compiling Luanti is only required if you plan to modify the Luanti engine itself.
In this guide, we use path/to/minetest to refer to the repository. Minetest was the old name of Luanti, and as of this writing, the repo has not been renamed.
1. Machine requirements
Luanti is compiled via Visual Studio and CMake, and version control is managed with Git.
- Visual Studio 2015 or newer including "Desktop development with C++" (includes CMake CLI but not CMake GUI)
- Git
1.1. Visual Studio (VS) with C++
-
Install VS from visualstudio.microsoft.com
-
In the VS installer, select "Desktop development with C++":

-
Confirm the installation.
This will install the C++ compiler used in later steps. VS is also the recommended IDE for Luanti.
1.2. CMake
The CMake GUI is a great tool to manage first-time setup of Luanti. It's not required, but recommended for anyone unfamiliar with CMake or its CLI. CMake itself comes bundled with Visual Studio, but the CMake GUI does not, and must be installed separately.
Install from cmake.org/download. Once installed, you should be able to run cmake-gui from the start menu:

Installing CMake this way also adds it to your PATH environment variable, and you should be able to run (Get-Command cmake).Path in PowerShell or which cmake in Bash and get a result.
If you don't install CMake manually, and are relying on the version that comes bundled with Visual Studio, you can follow these steps:
-
Find the
/path/to/bin/CMake.exe. It should be at or aroundC:\Program Files\Microsoft Visual Studio\2022\Community\Common7\IDE\CommonExtensions\Microsoft\CMake\CMake\bin\cmake.exe. -
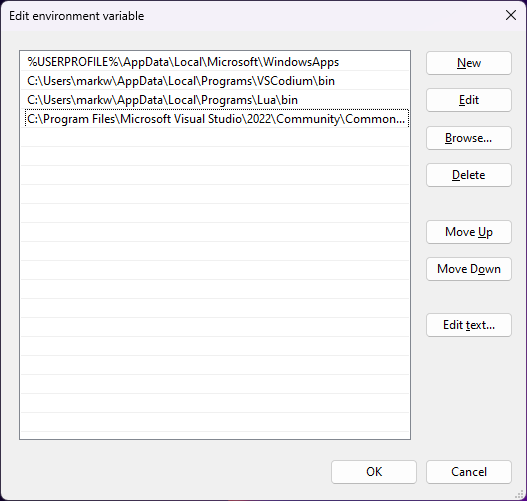
Edit your PATH environment variable to include the
/path/to/bin(but notcmake.exe).- Start menu > Search "env" > Edit the system environment variables > Environment Variables... > Path > Edit... > New > Paste the path from step 1

-
Restart your terminal
-
Try
(Get-Command cmake).Pathin PowerShell orwhich cmakein Bash to ensure CMake can be executed from the terminal.
2. Install Luanti dependencies
Once VS and CMake are ready to use, you can install Luanti's dependencies. Luanti requires several C++ packages to function, which are installed by CMake and compiled by a C++ compiler bundled with VS. CMake uses a tool called vcpkg behind the scenes, which you may see referenced elsewhere in this project.
2.1. Optional dependencies
Some optional dependencies are recommended for advanced development. You can add them to vcpkg.json to install them along with the required dependencies.
curlis highly recommended, as it's required to read the serverlist;curl[winssl]is required to use the content store.openal-soft,libvorbisandliboggare optional, but required to use sound.luajitis optional, it replaces the integrated Lua interpreter with a faster just-in-time interpreter.gmpandjsoncppare optional, otherwise the bundled versions will be compiledgettextis optional, but required to use translations.
2.2. Install dependencies
You can install dependencies via CLI or via CMake GUI, whichever your prefer.
To install dependencies via CLI, you can run this program in PowerShell:
# Run this while in `path/to/minetest`
$vs="Visual Studio 17 2022" # or "Visual Studio 16 2019", whatever matches your machine
$toolchain_file="C:/Program Files/Microsoft Visual Studio/2022/Community/VC/vcpkg/scripts/buildsystems/vcpkg.cmake" # or wherever you installed vcpkg.cmake manually
cmake build -G "$vs" -DCMAKE_TOOLCHAIN_FILE="$toolchain_file" -DCMAKE_BUILD_TYPE=Release -DENABLE_CURSES=OFF
The above steps may take about 10-30 minutes, depending on your device.
You may see several warnings and even errors. For now, you may be able to ignore those and try going to step 3 once the installation completes. If you are struggling, please open an issue on the GitHub repo.
To install dependencies via CMake GUI:
- Start up the CMake GUI (Win > search "cmake-gui" > open)
- Select Browse Source... and select
path/to/minetest(where you've cloned the repo) - Select Browse Build... and select
path/to/minetest/build(a new folder that CMake will prompt to create) - Select Configure
- Choose the right Visual Studio version and target platform. Currently, Luanti uses Visual Studio 16 2019, but newer VS versions should work as well. The VS version has to match the version of the installed dependencies.
- Choose Specify toolchain file for cross-compiling
- Click Next
- Select the vcpkg toolchain file, e.g.
C:/Program Files/Microsoft Visual Studio/2022/Community/VC/vcpkg/scripts/buildsystems/vcpkg.cmake. - Click Finish
- Wait until CMake generates the cache file (this may take about 10-30 minutes, depending on your device)
- If there are any errors, solve them and hit Configure
- Click Generate
- Click Open Project
You may see several warnings and even errors. For now, you may be able to ignore those and try going to step 3 once the installation completes. If you are struggling, please open an issue on the GitHub repo.
3. Compile Luanti
Once the dependencies are installed, there are two ways to compile Luanti: via Visual Studio or via CLI.
3.1. Compile in Visual Studio
- Compile Luanti inside Visual Studio using the green play button.
- If you get "Unable to start program '...\x64\Debug\ALL_BUILD'. Access is denied", try compiling via the CLI instead.
3.2. Compile via CLI
Run the following command:
# Run this while in `path/to/minetest`
cmake --build build --config Release
4. Running Luanti
Once Luanti is compiled, you should be able to run path/to/minetest/bin/Release/luanti.exe and start up the Development Test game :)
5. Making changes
If you make changes to the C++ code, you can usually just re-compile without re-installing the dependencies. Then you can re-run Luanti to confirm that your changes were applied.
Appendix: Windows Installer using WiX Toolset
Requirements:
In the Visual Studio 2017 Installer select Optional Features -> WiX Toolset.
Build the binaries as described above, but make sure you unselect RUN_IN_PLACE.
Open the generated project file with Visual Studio. Right-click Package and choose Generate. It may take some minutes to generate the installer.